
Home › Epic › Day One and Week One › Inpatient guide
Inpatient Quick Start Guide
A hospital shift in Epic, start to finish, in the order you will do it: for your first weeks here, or as a refresher after time away. For physicians, advanced practice providers (APPs), residents, and fellows caring for admitted patients. Every screen below is from Freeman's Epic: click one to enlarge it and step through the rest of that section. The hospitals go live Saturday, October 24.
Rounding on go-live day? Run the First-day checklist for each patient as well: it confirms cutover landed cleanly.
Before your first shift
Four things that make the first shift smooth. Each one has its own page.
Finish training and test-out. Your Epic login depends on it.
Set up Haiku and Secure Chat on your phone. Mobile Heartbeat is retired: nurses now reach you through Secure Chat messages and Epic VoIP calls.
Personalize Epic. Note speed buttons, preference lists, and SmartPhrases. What you built in production (PRD) is already there.
Prescribe controlled substances at discharge? Set up Imprivata ID for electronic prescribing of controlled substances (EPCS).

Log in and land on your team
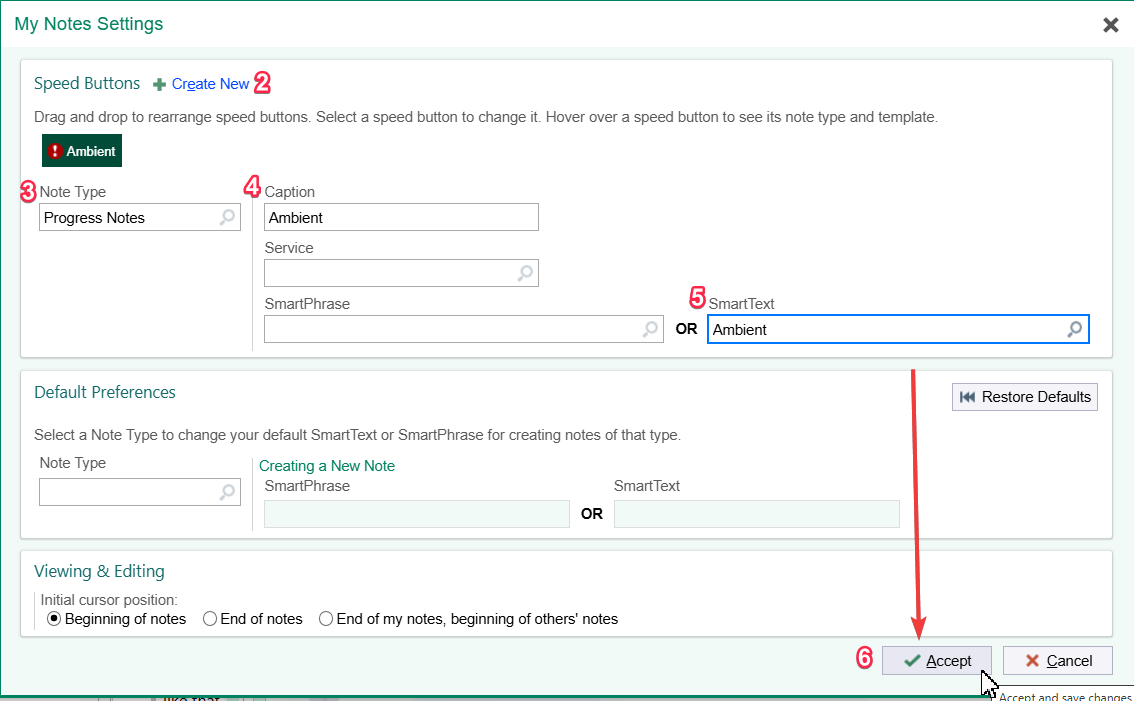
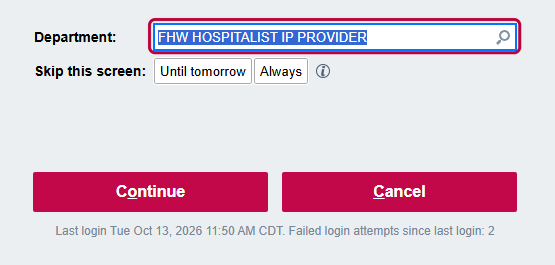
Choose the right department. Hospital-only providers log in to their facility and specialty inpatient department (named facility, specialty, IP). If you also work in a clinic, use your clinic department.
Your team sign-in is automatic. If you are on the call schedule in Amion, Epic signs you in to your team for the shift. There is no sign-in window at login.
Make schedule changes in Amion, not in Epic. Changes appear in Epic within about 15 minutes; manual changes in Epic are overwritten at the next import.
Sign In still matters for some. Residents taking their assignments, and anyone rounding who is not on the Amion schedule, use the Sign In button on the Patient Lists toolbar.

Find your patients
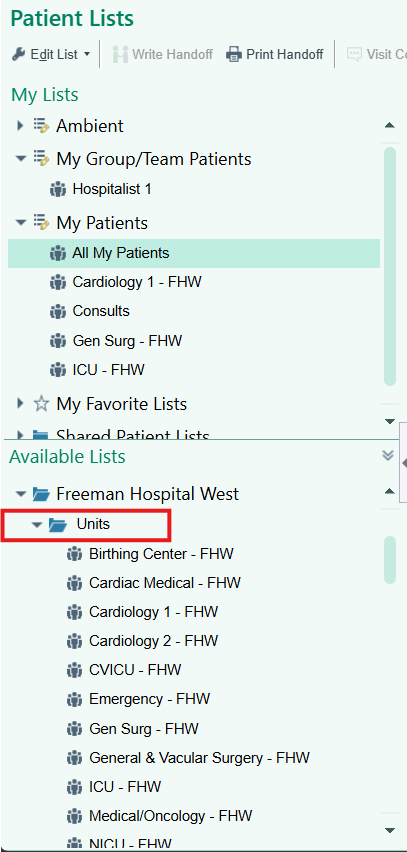
Patient Lists is your home base on the floors.
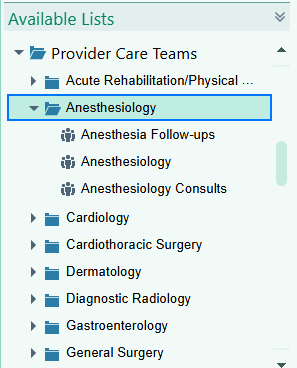
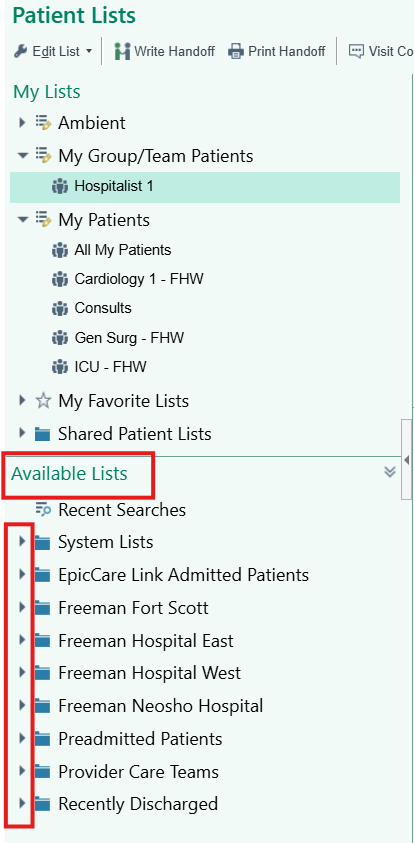
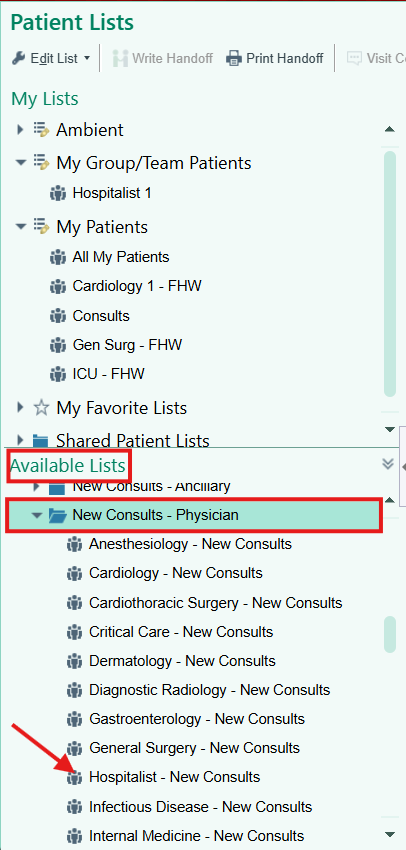
Open your team's list. In Available Lists, open Provider Care Teams, then your specialty. Every patient assigned to the team is on it.
Looking by unit? Open the folder for your hospital, then the unit list. Still missing someone? Try All Admitted Patients, or search by name.
Keep the lists you use. Lists you add to My Lists open with you every day.
Watch the icons. New results show as icons on the list and in Storyboard; during the admission they do not go to your In Basket.

Pre-round on each patient
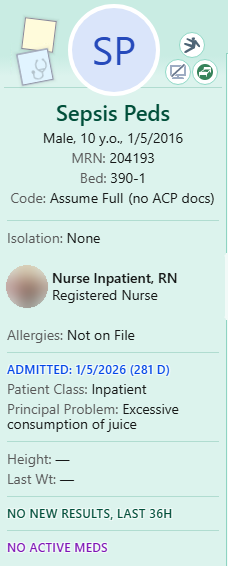
Start with Storyboard, the strip down the left of the chart: principal problem, allergies, code status, care team, and new results. Hover over any section for more.
Find things fast. Press Ctrl+Space and type a word (a condition, a drug, a test) to see everything related. Results Review trends labs over time.
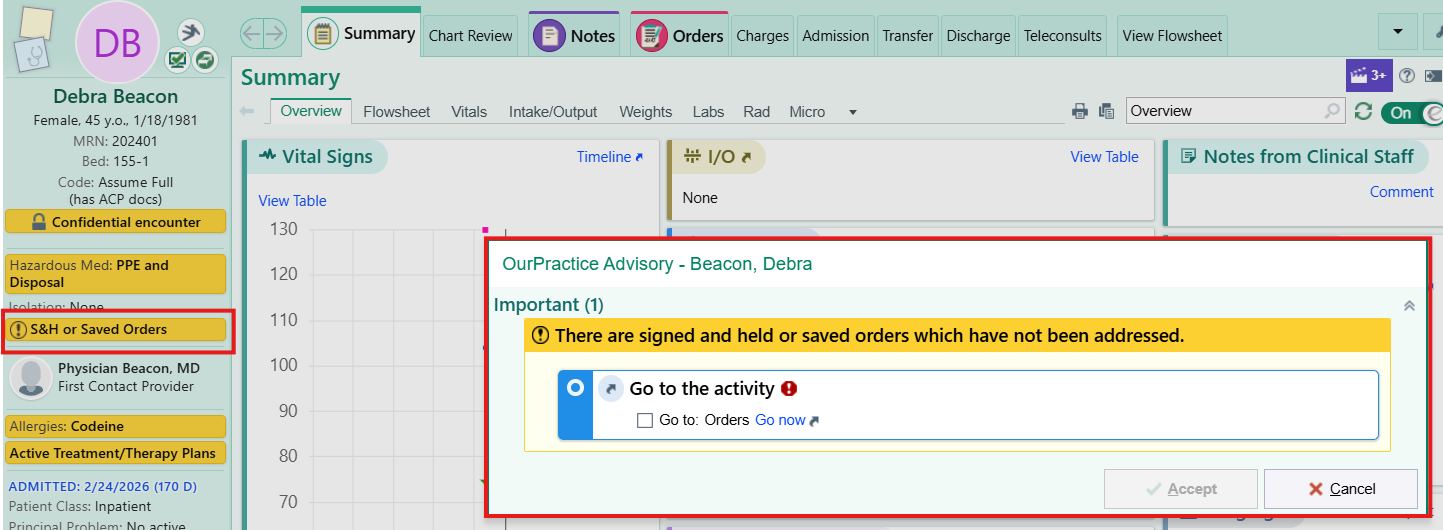
Check for colored advisory banners (OurPractice Advisories, or OPAs) and pended orders others have queued for you.
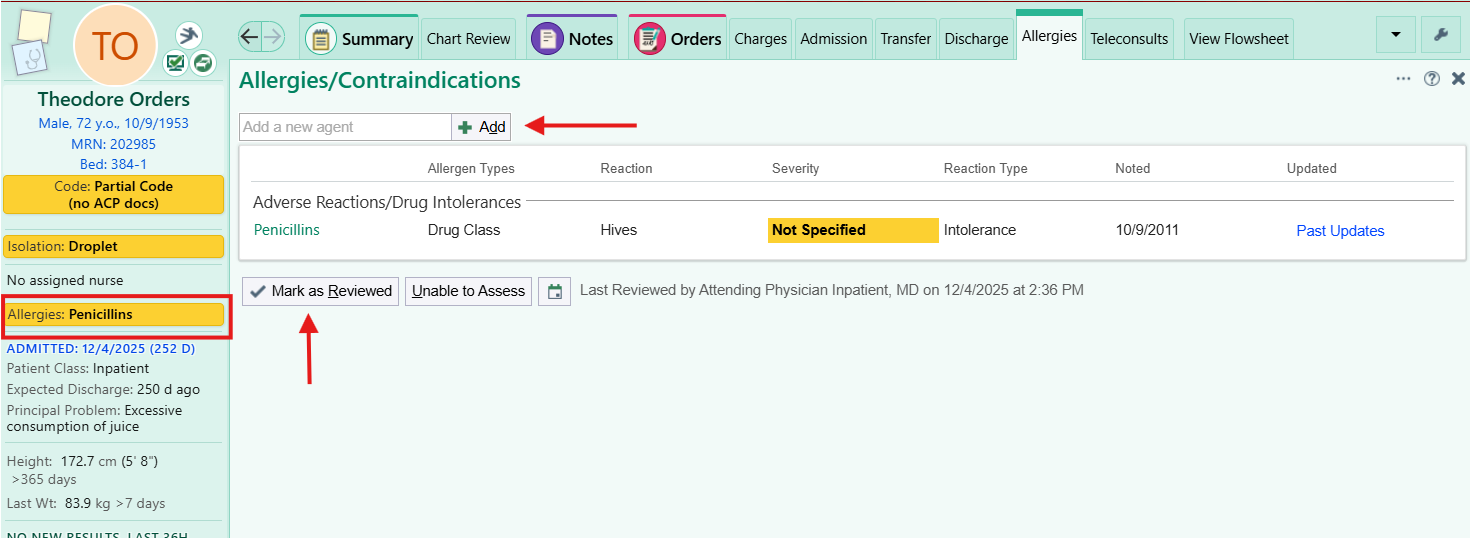
Confirm allergies and click Mark as Reviewed.
Outside records come in through Care Everywhere; about three years of Freeman notes and labs converted from the legacy systems.
Orders and cosign
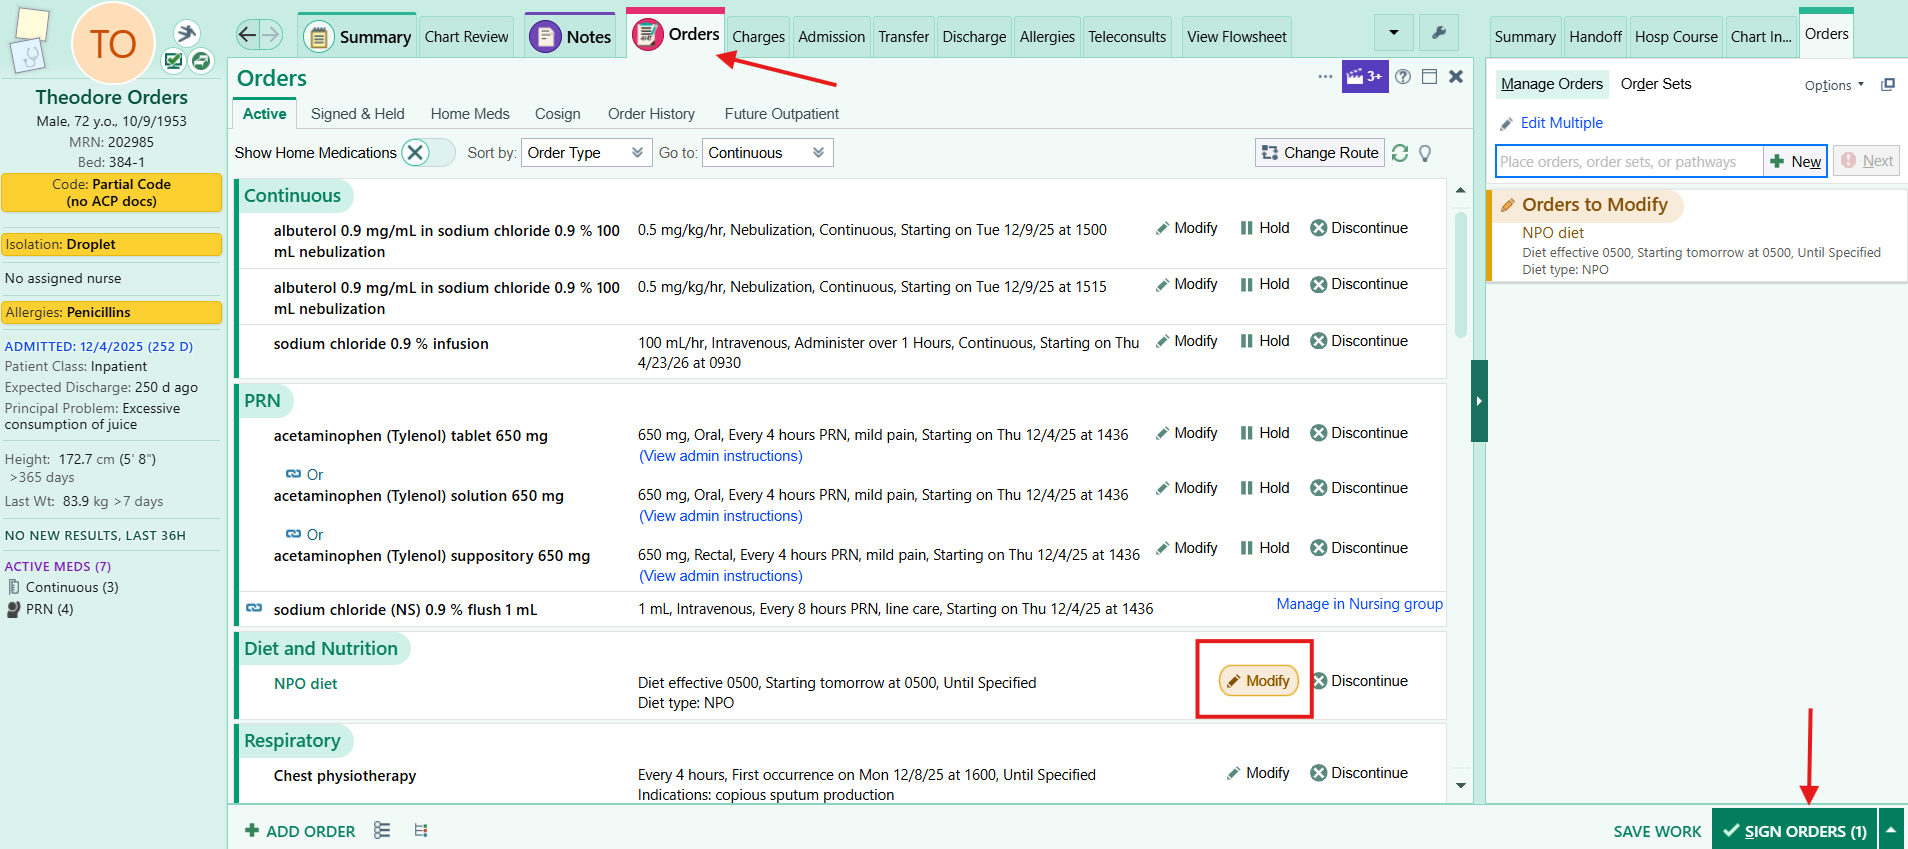
Review active orders on the Orders activity, Active tab. To change one, click Modify, edit, and sign. Discontinue and reorder instead when the change is more than a detail.
Pended is not ordered. Case management, students, and others pend orders for you. Read each one, then sign, edit, or delete it.
Order sets place a related group at once (admission, discharge, blood products). Add single orders on top as needed.
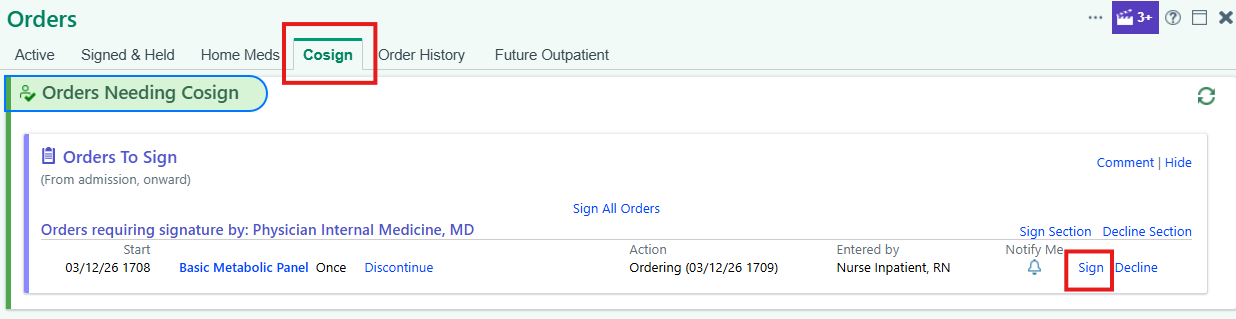
Cosign from the Cosign tab of the Orders activity, or for all your patients at once from the Chart Completion folder in In Basket. Choose Sign or Decline; Notify Me does not clear the cosign.
Pediatric services: confirm which weight drives weight-based doses.
Notes and charges
Start a note from the Notes activity: pick the tab for the note type, then New Note, a NoteWriter template, or one of your speed buttons. Admission, transfer, and discharge navigators have their own note sections.
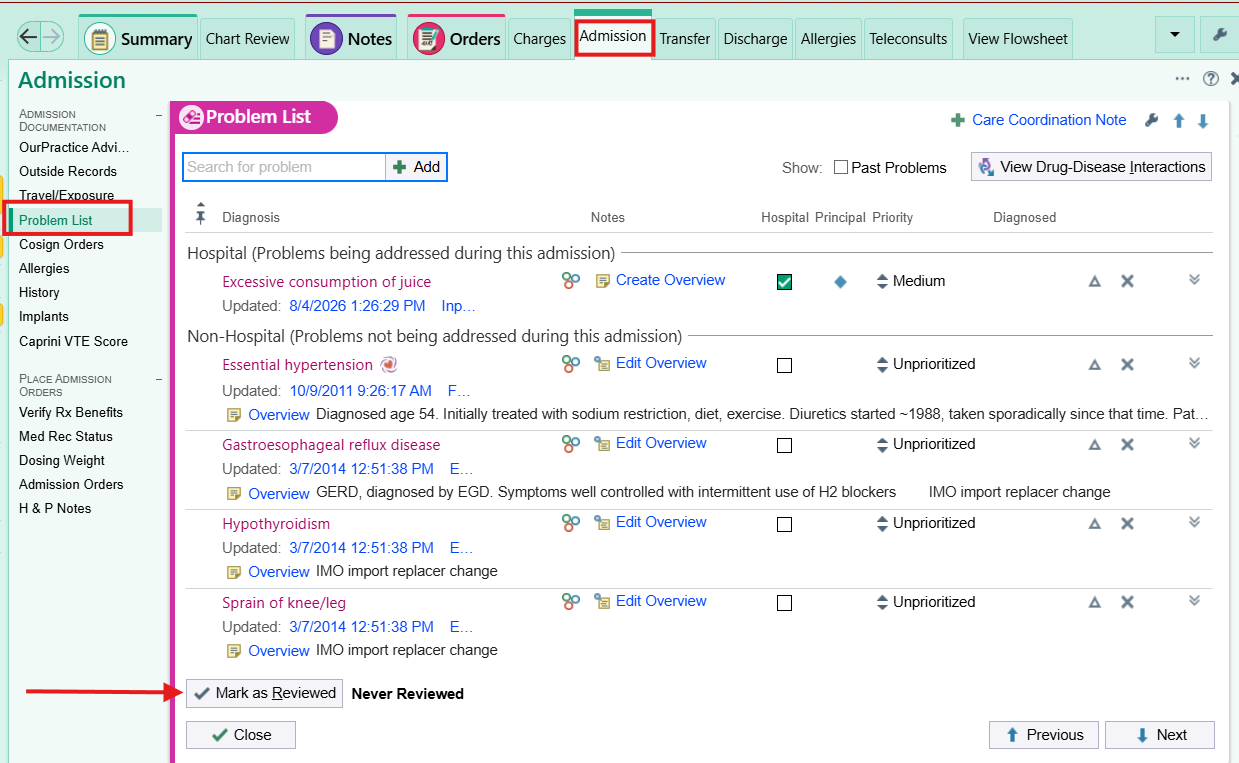
Write by problem. Editing the Assessment and Plan updates the problem list, and the problem list feeds tomorrow's note. Keep the principal problem current.
Before you sign, press F2 to catch any blank (***) or pick list you missed.
Interrupted? Pend the note. It waits on the Incomplete tab and in In Basket (Chart Completion). Others should not act on a pended note. To change a signed note, add an addendum.
Charges pop up when you sign an H&P, progress note, consult, or discharge summary. Choose the charge by time or by medical decision making and accept. Skipped it? File it later from the Charges activity.
Treatment team, consults, and contact
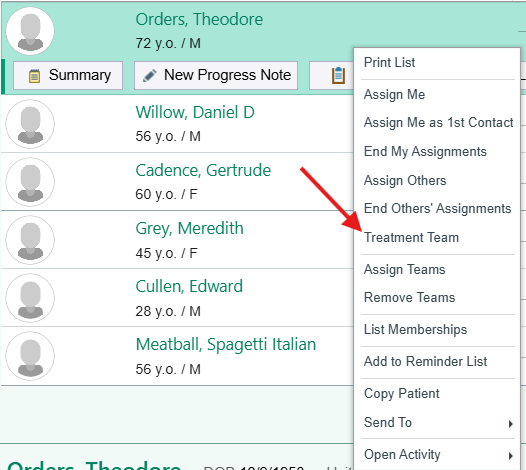
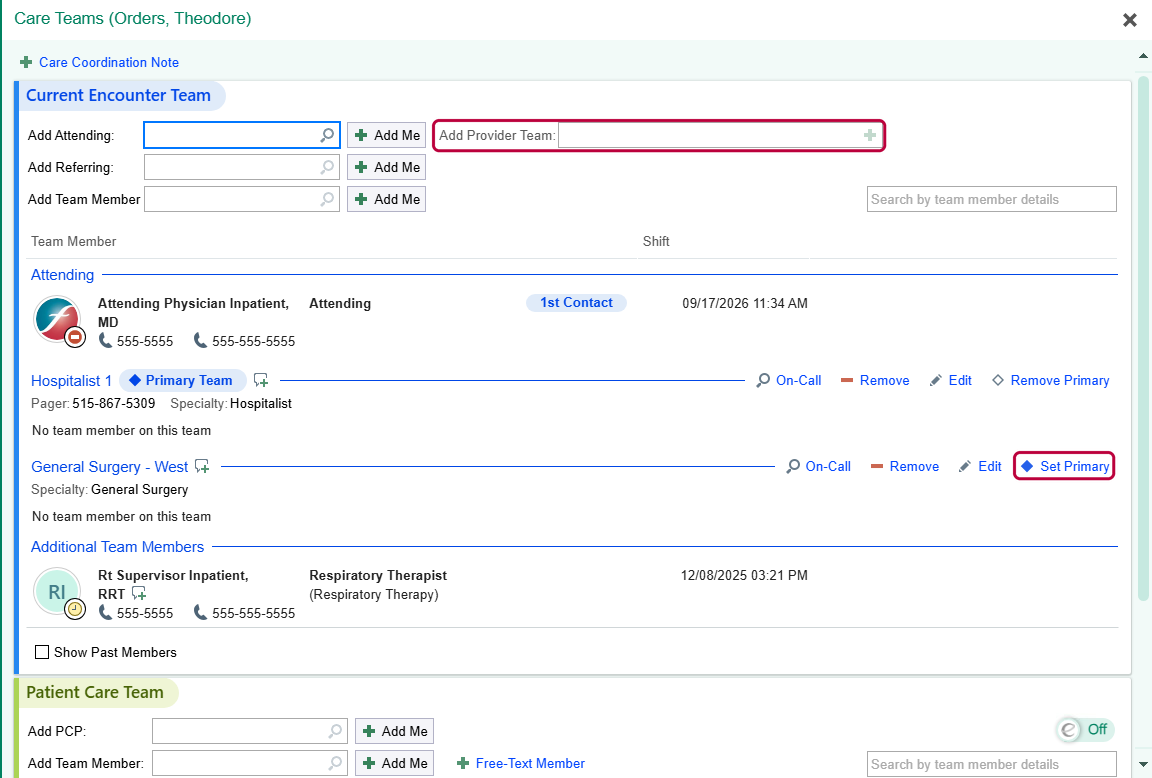
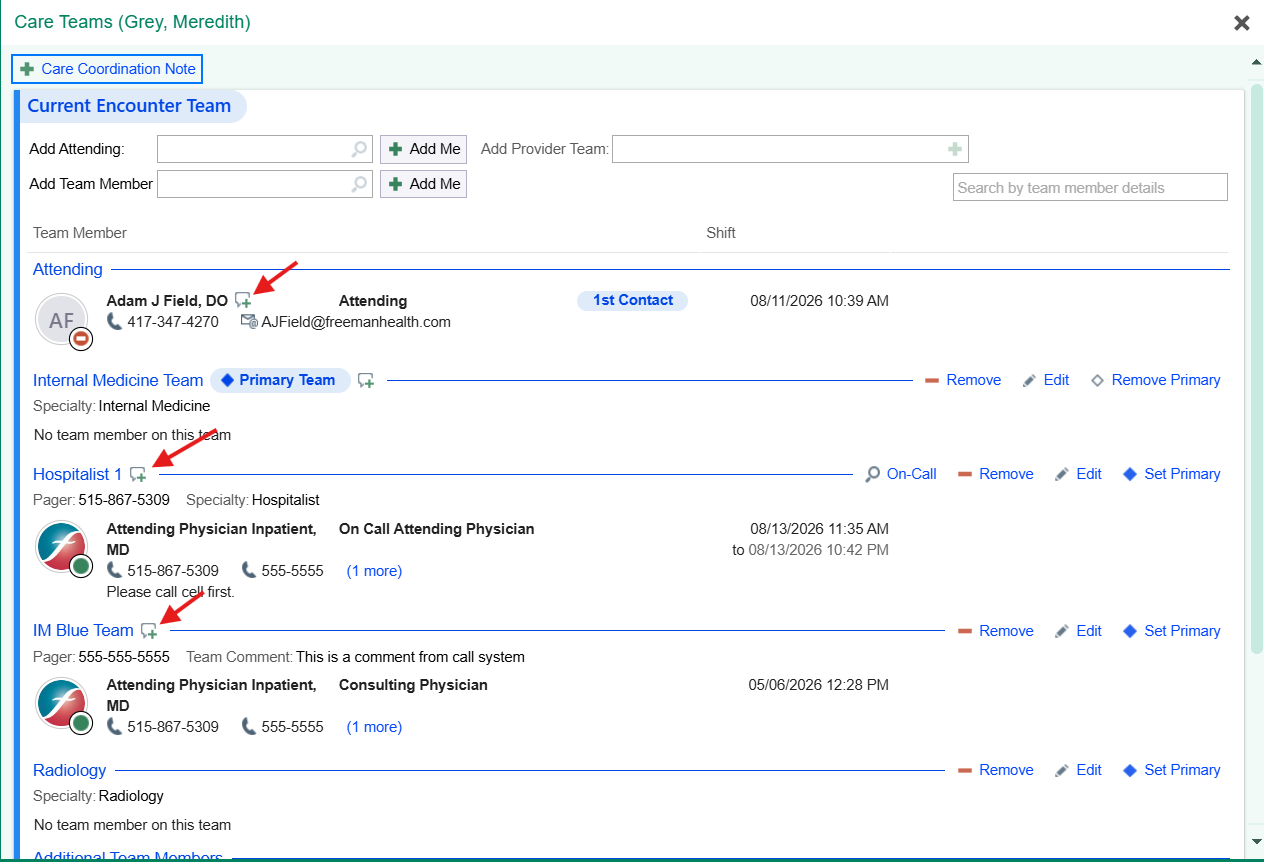
Keep the treatment team current. Right-click the patient on your list and choose Treatment Team. There can be no gap in the primary team: add the new primary provider or team before removing the old one.
Asking for a consult? Talk to the consultant first, by Secure Chat or phone (direct communication is required), then order the consult to the group. The group joins the treatment team.
Receiving consults? They land on your facility's New Consults list for your specialty. Write the consult note from the Notes sidebar's Consults button and choose the consult order, so signing the note completes the order.
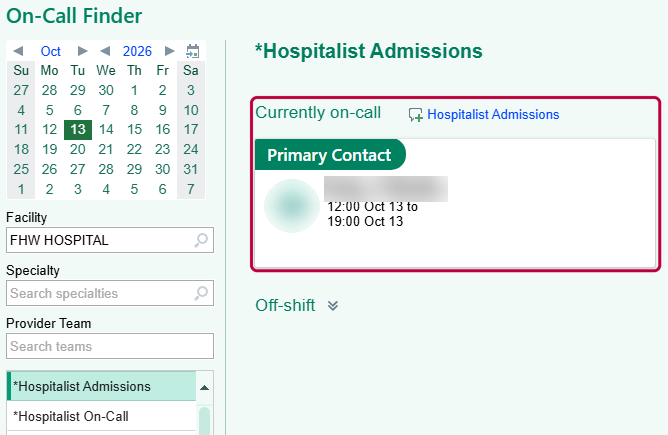
Find the right person. The treatment team shows each team's first contact; On-Call Finder shows who is on call for any service. Reach them by Secure Chat (from the chat icon beside each team) or by phone.
Admit a patient
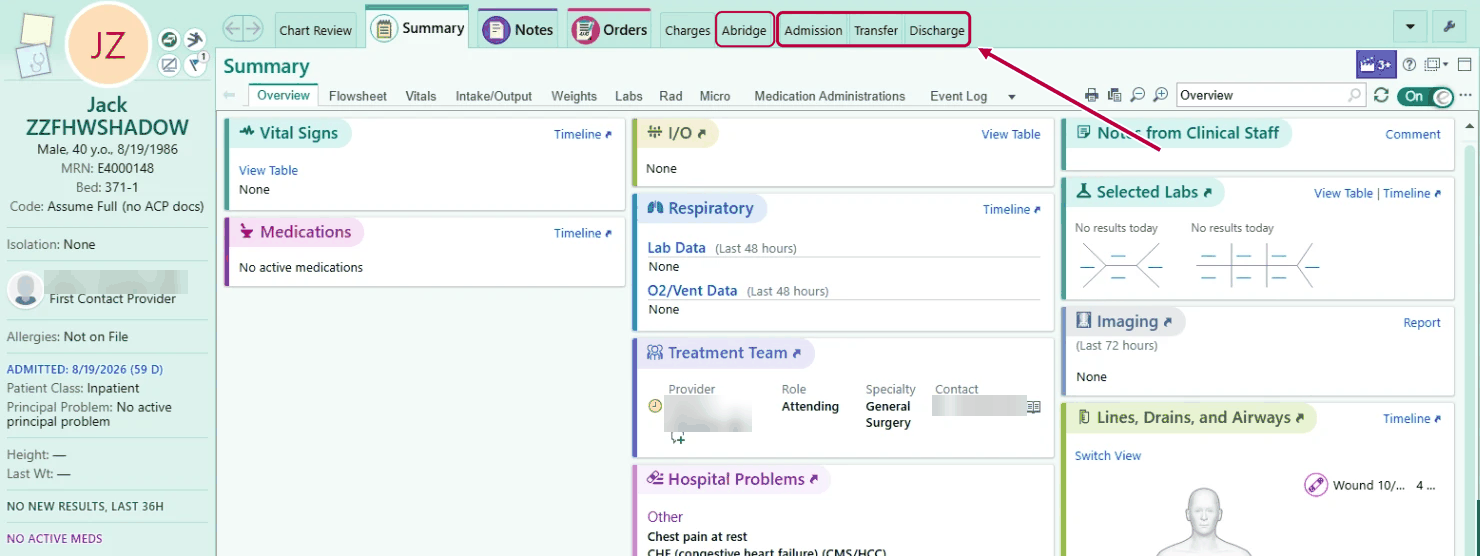
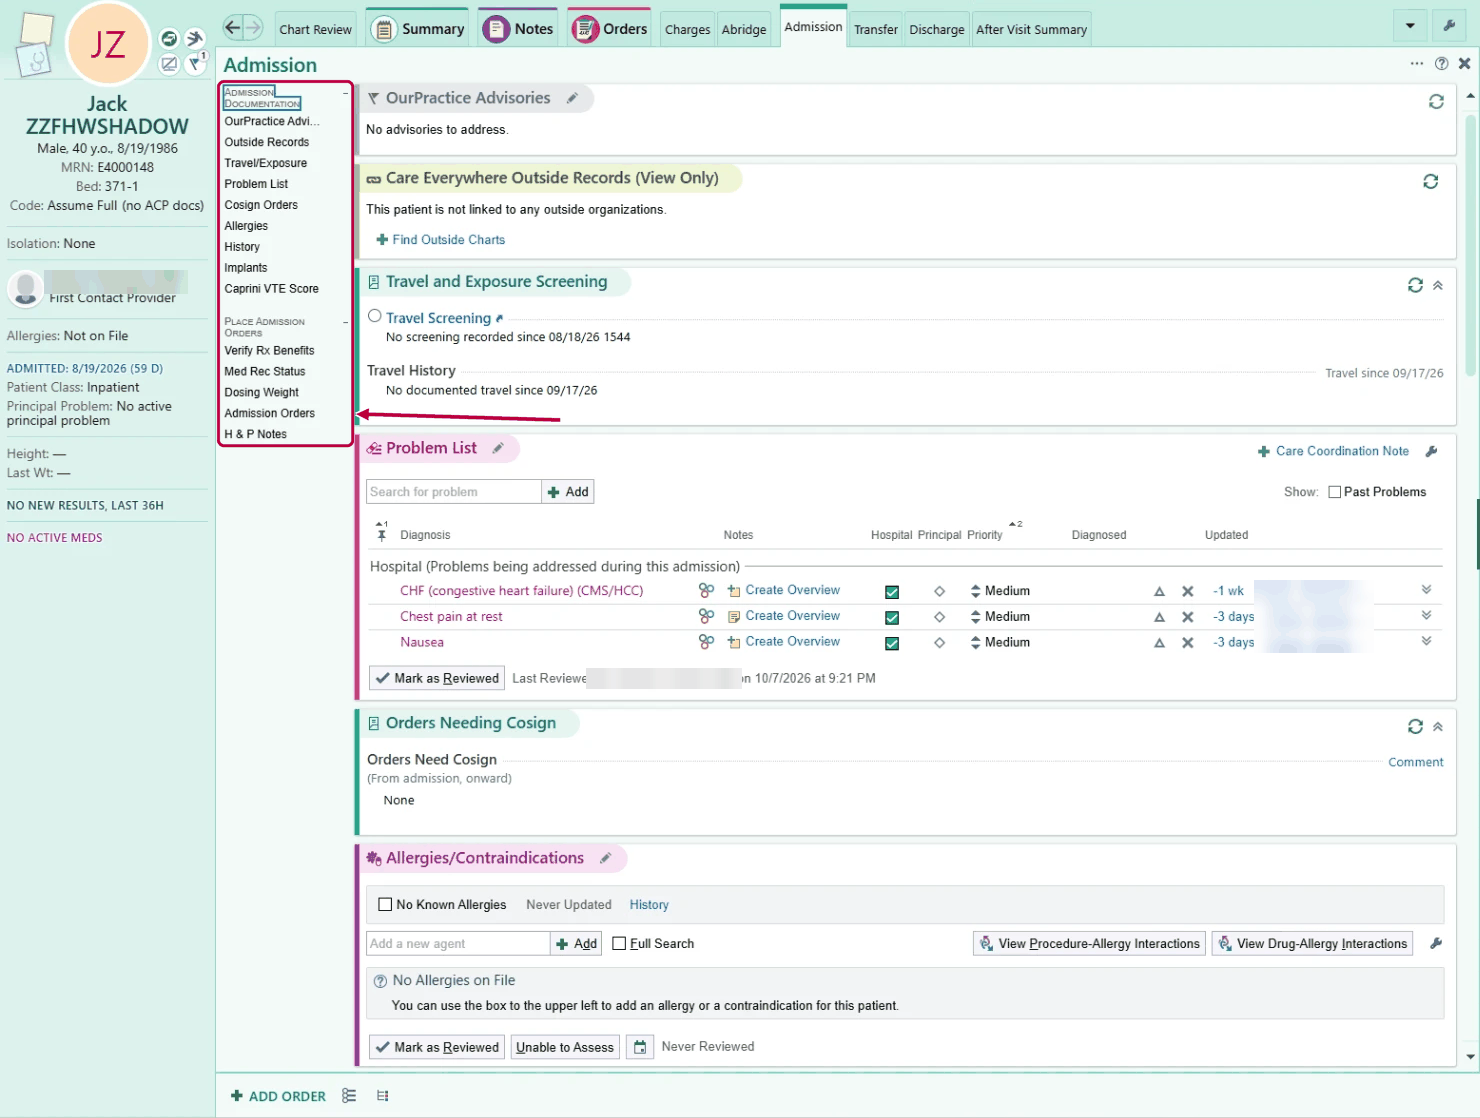
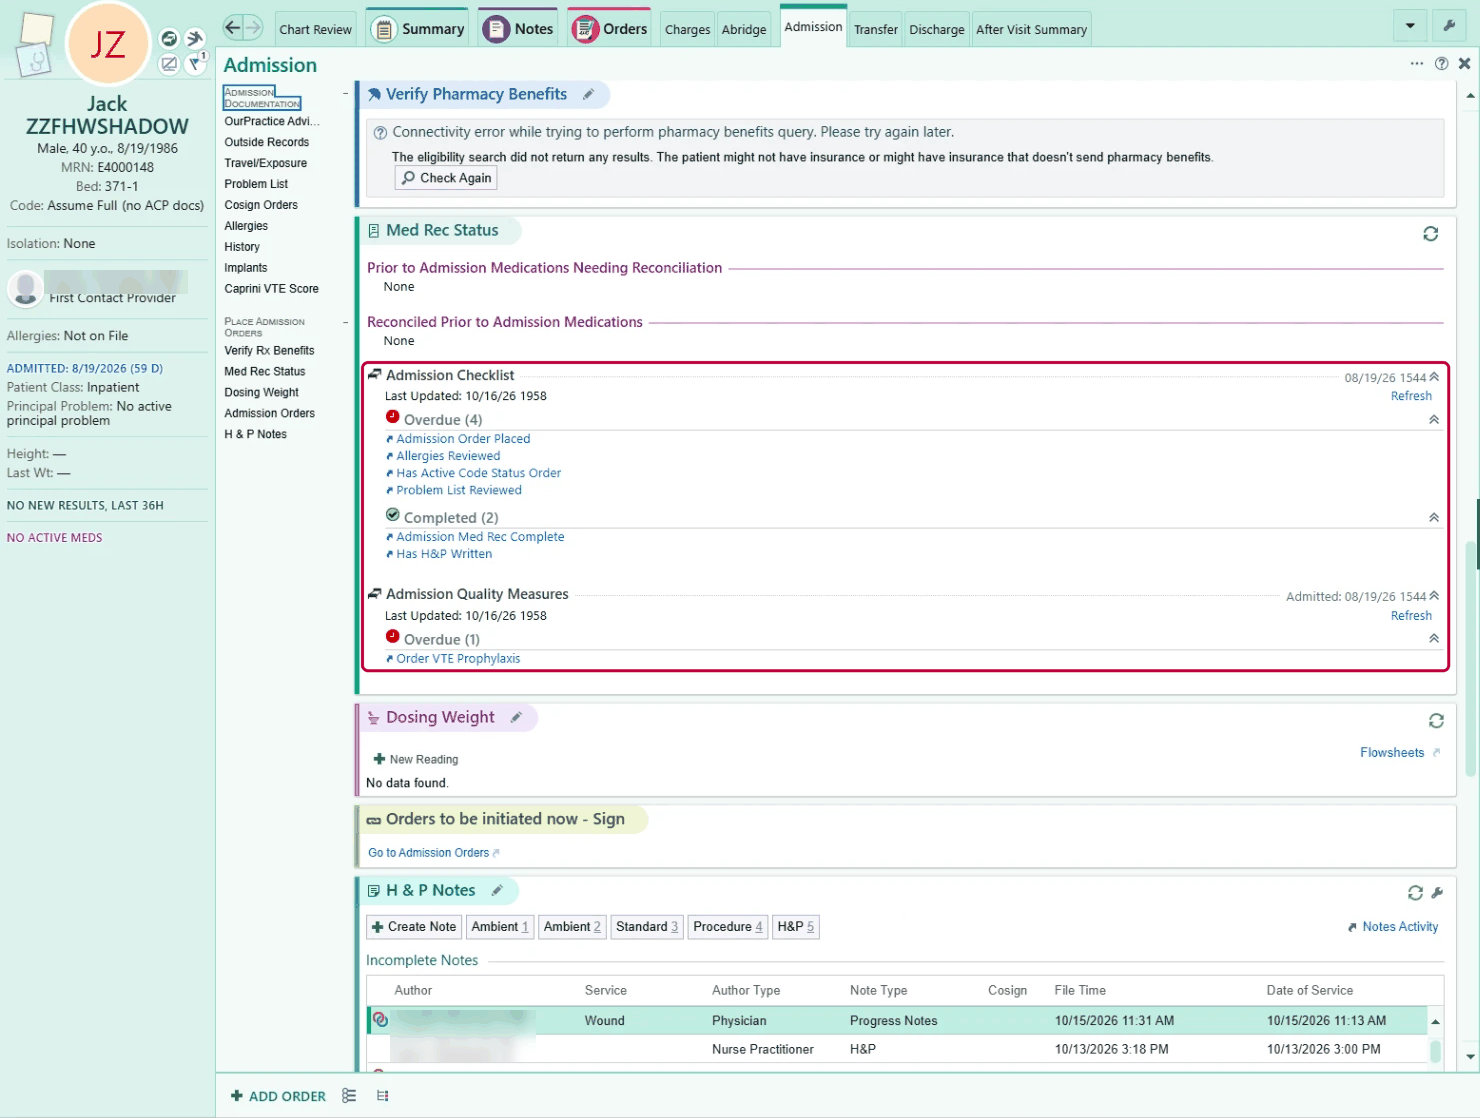
Navigators are the Admission, Transfer, and Discharge tabs in the chart. Work down the Admission navigator: each section is a step.
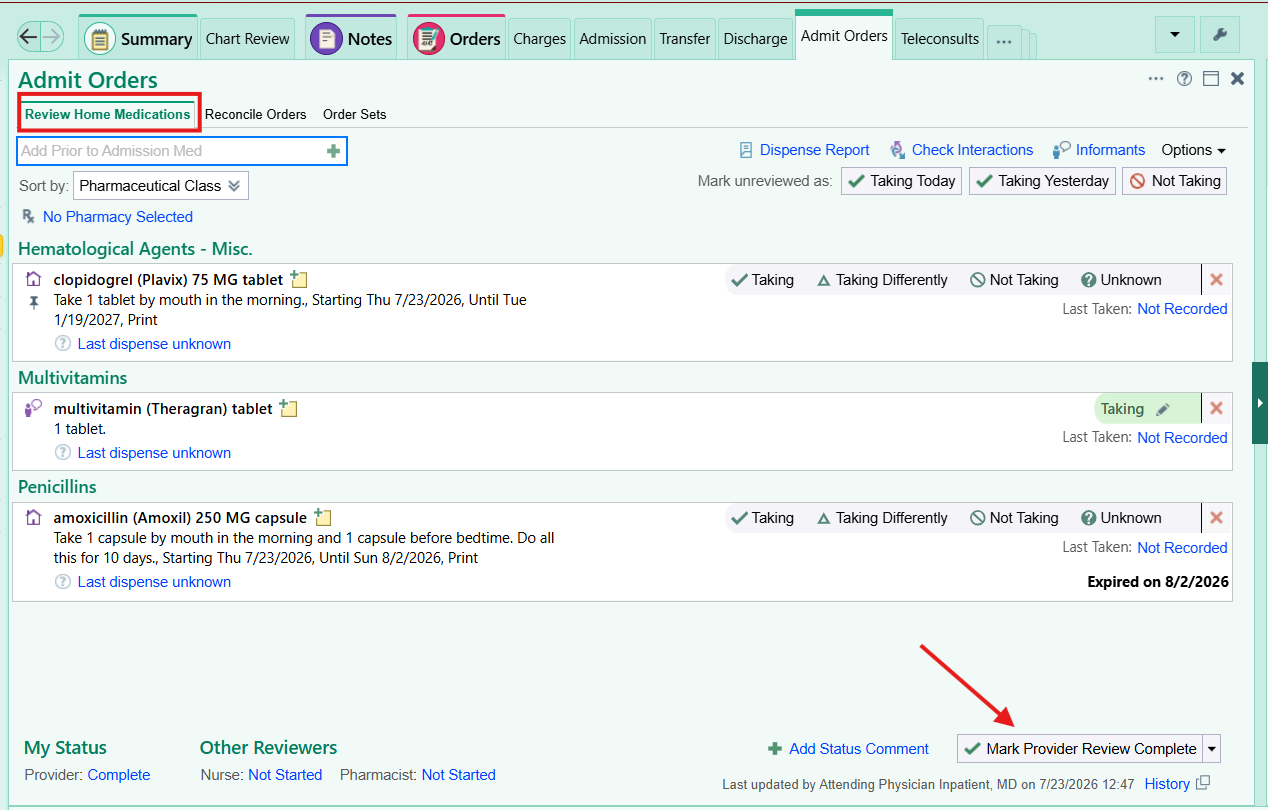
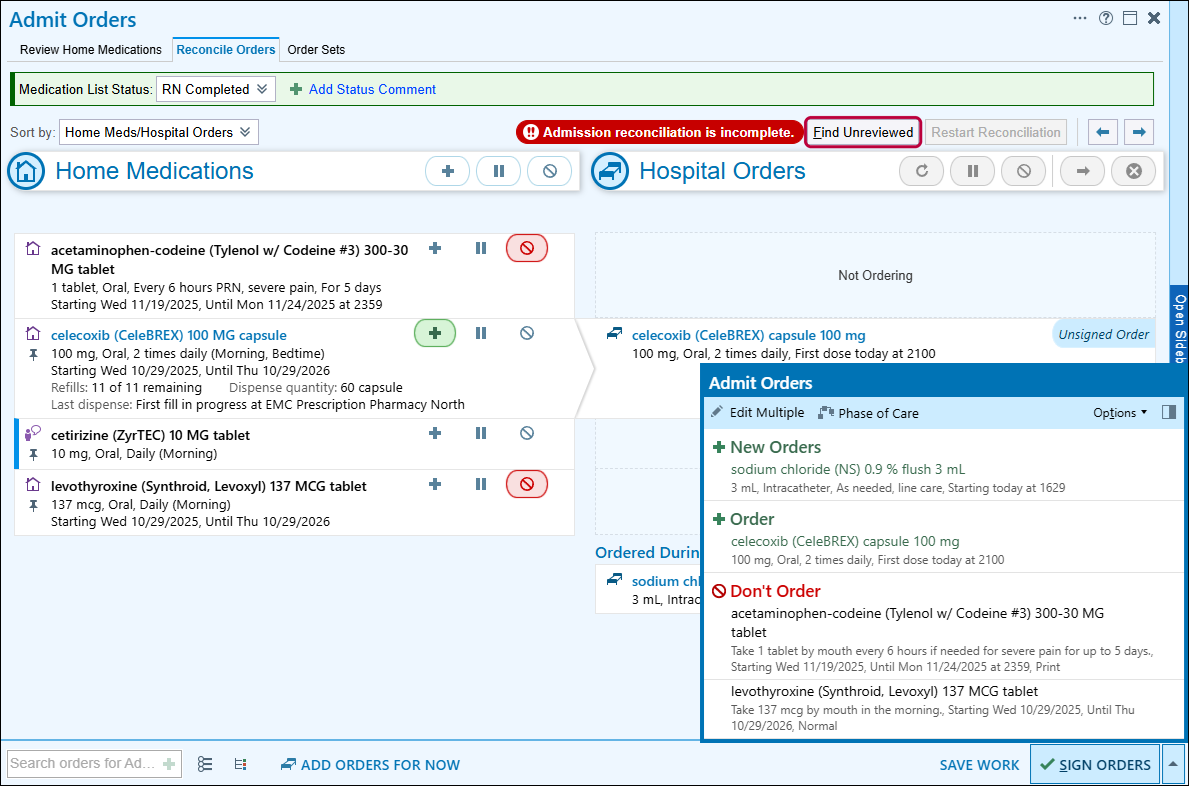
Admission medication reconciliation. In Admission Orders, decide each home medication: order, do not order, hold, or change. Review any orders already placed (from the emergency department or the operating room) and continue or stop each. Find Unreviewed shows what is left.
Admission orders from an order set, searched from Add Orders for Admission. Fill in the admit order: service, level of care, principal problem, and expected length of stay.
Avoid Orders for Now here. They go active immediately, are not held for the unit, and lock admission medication reconciliation until you sign or discard them.
Sign. If the patient is not on the unit yet, signing holds the orders until the unit releases them on arrival (signed and held).
Write the H&P from the H&P Notes section of the navigator, and update the problem list.
Transfer a patient
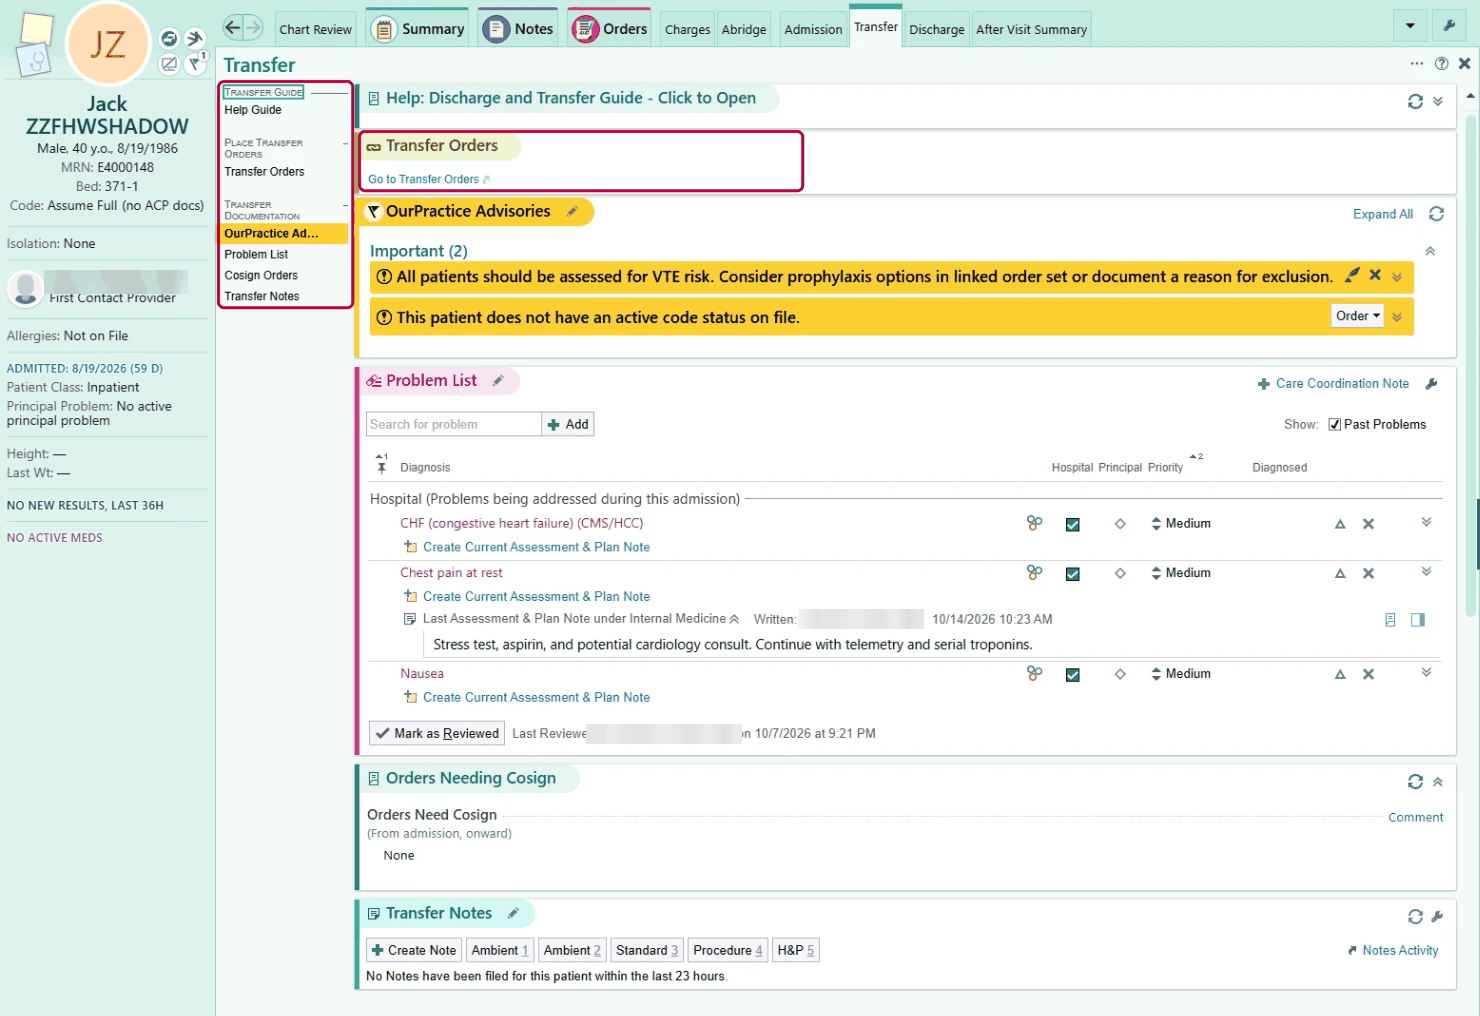
Open the Transfer navigator, then Transfer Orders. Fill in the transfer order: receiving service and level of care.
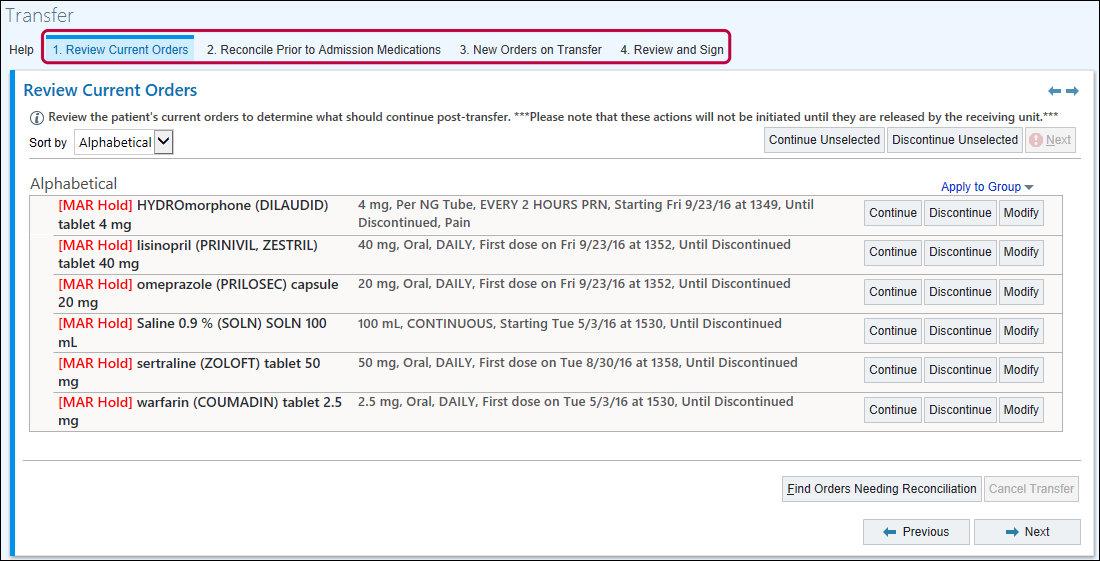
Reconcile: continue, stop, or change each current order for the new unit, and revisit the home medication decisions from admission.
Use Orders for Transfer, not Orders for Now, for anything that should start on the new unit.
Both units own it. The sending and the receiving team each make sure transfer medication reconciliation is done.
Write the transfer note in the navigator's Transfer Notes section.
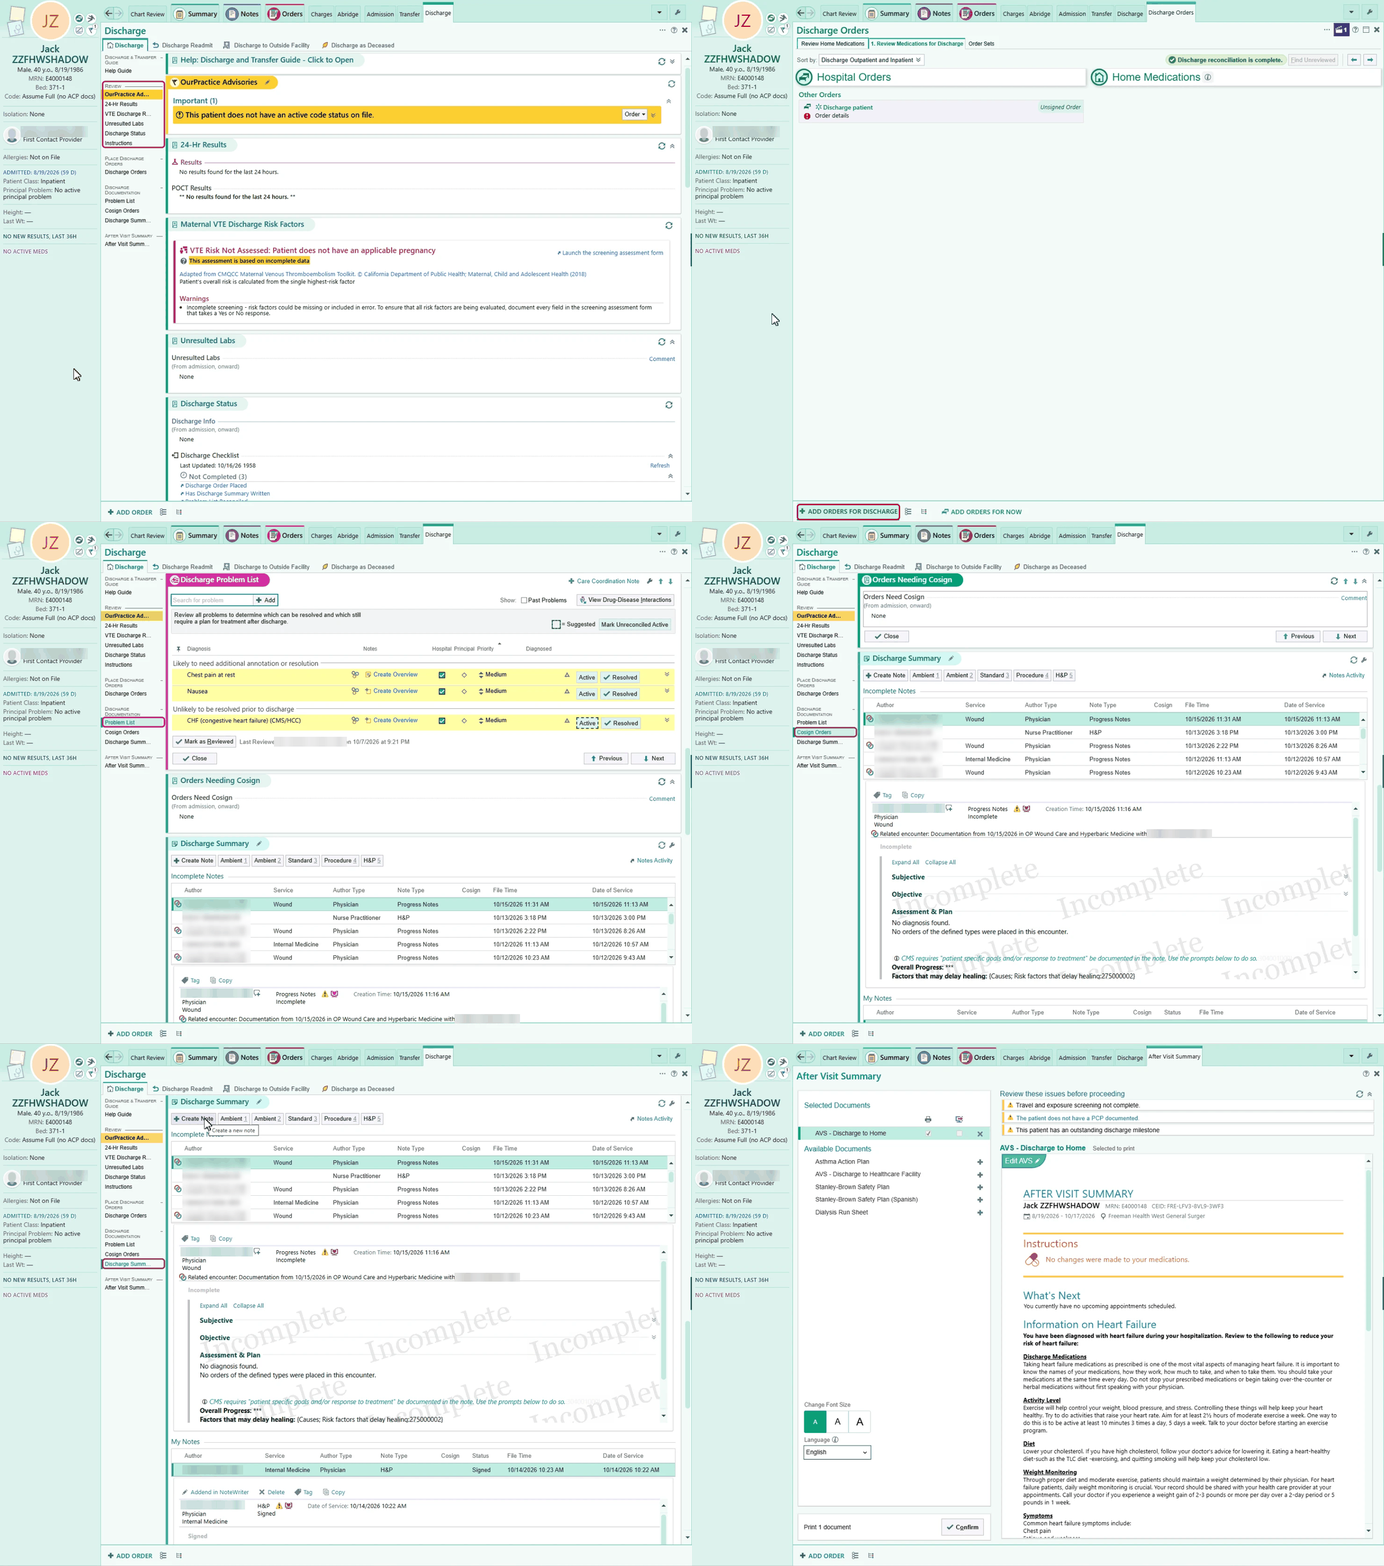
Discharge a patient
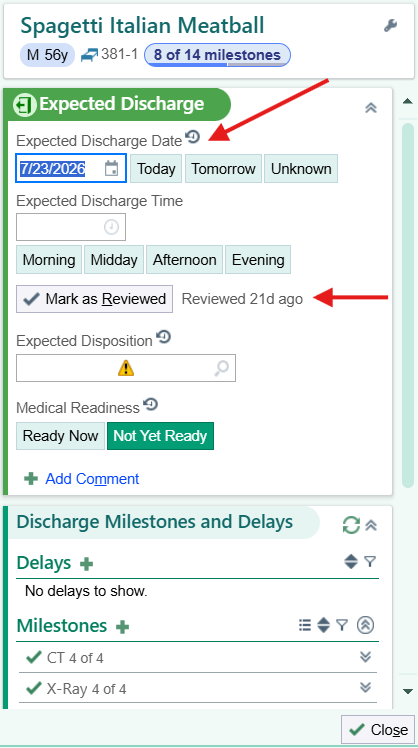
Start early: set the expected discharge date on day one so the whole team plans toward it.
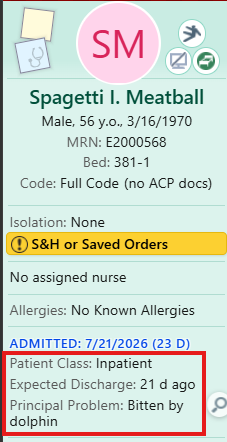
Set the expected discharge date. Hover over Patient Class in Storyboard, open the discharge plan, and update the date.
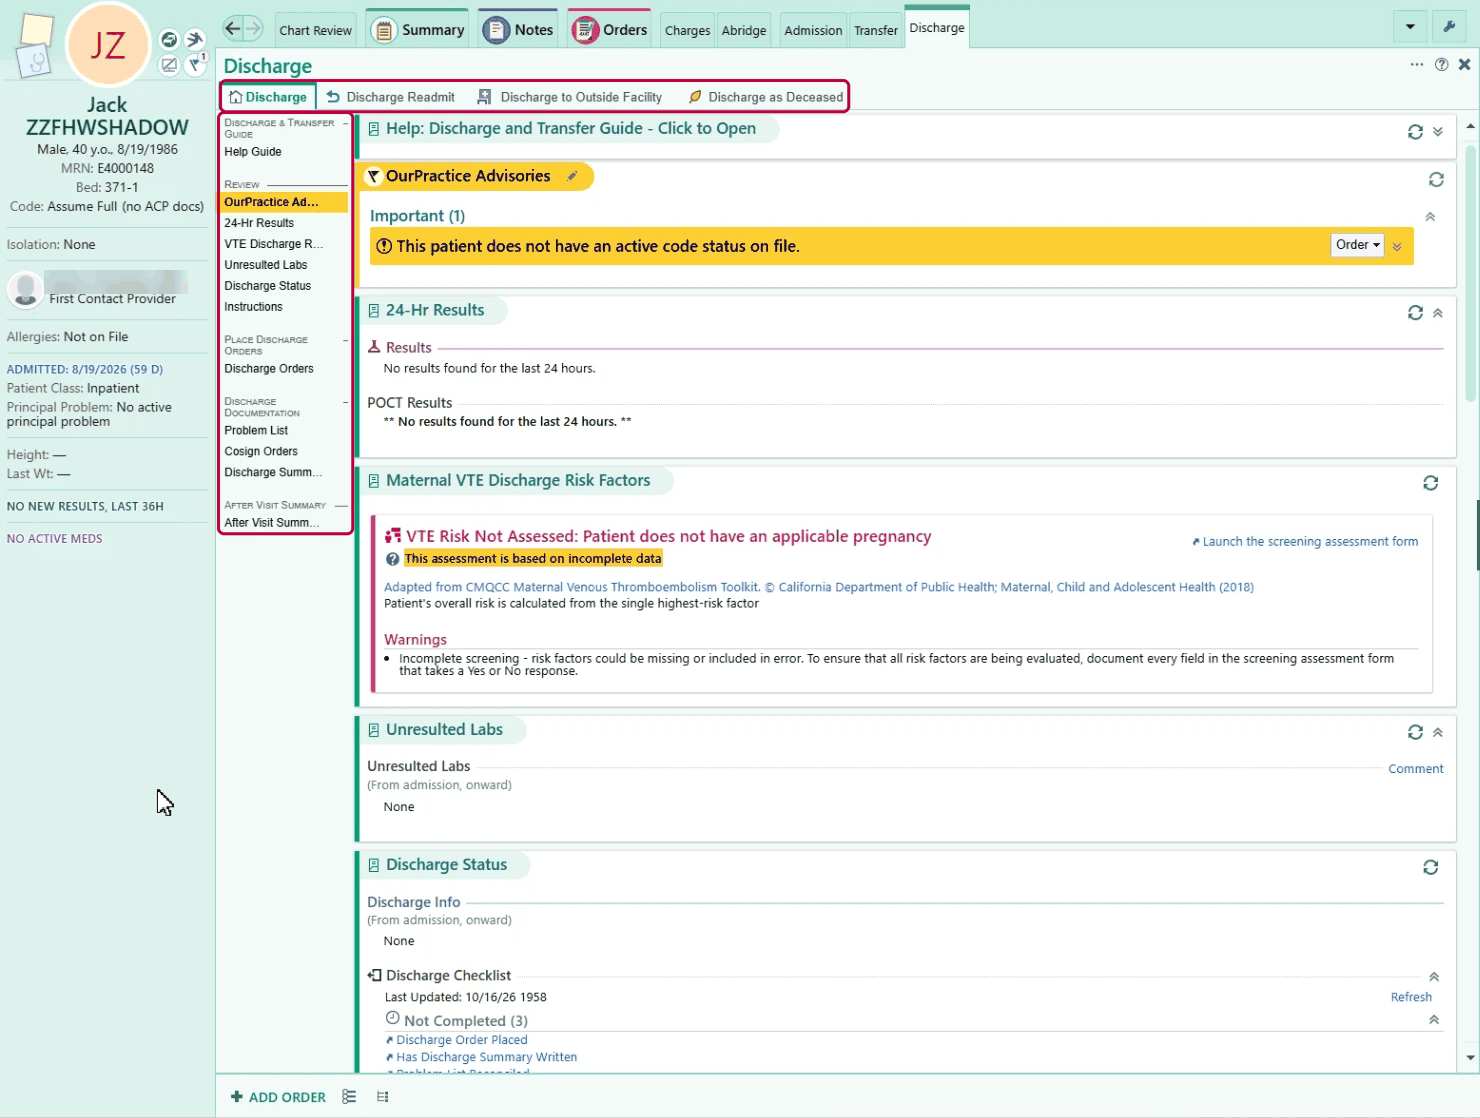
Pick the right tab in the Discharge navigator: home, an outside facility, discharge and readmit, or deceased.
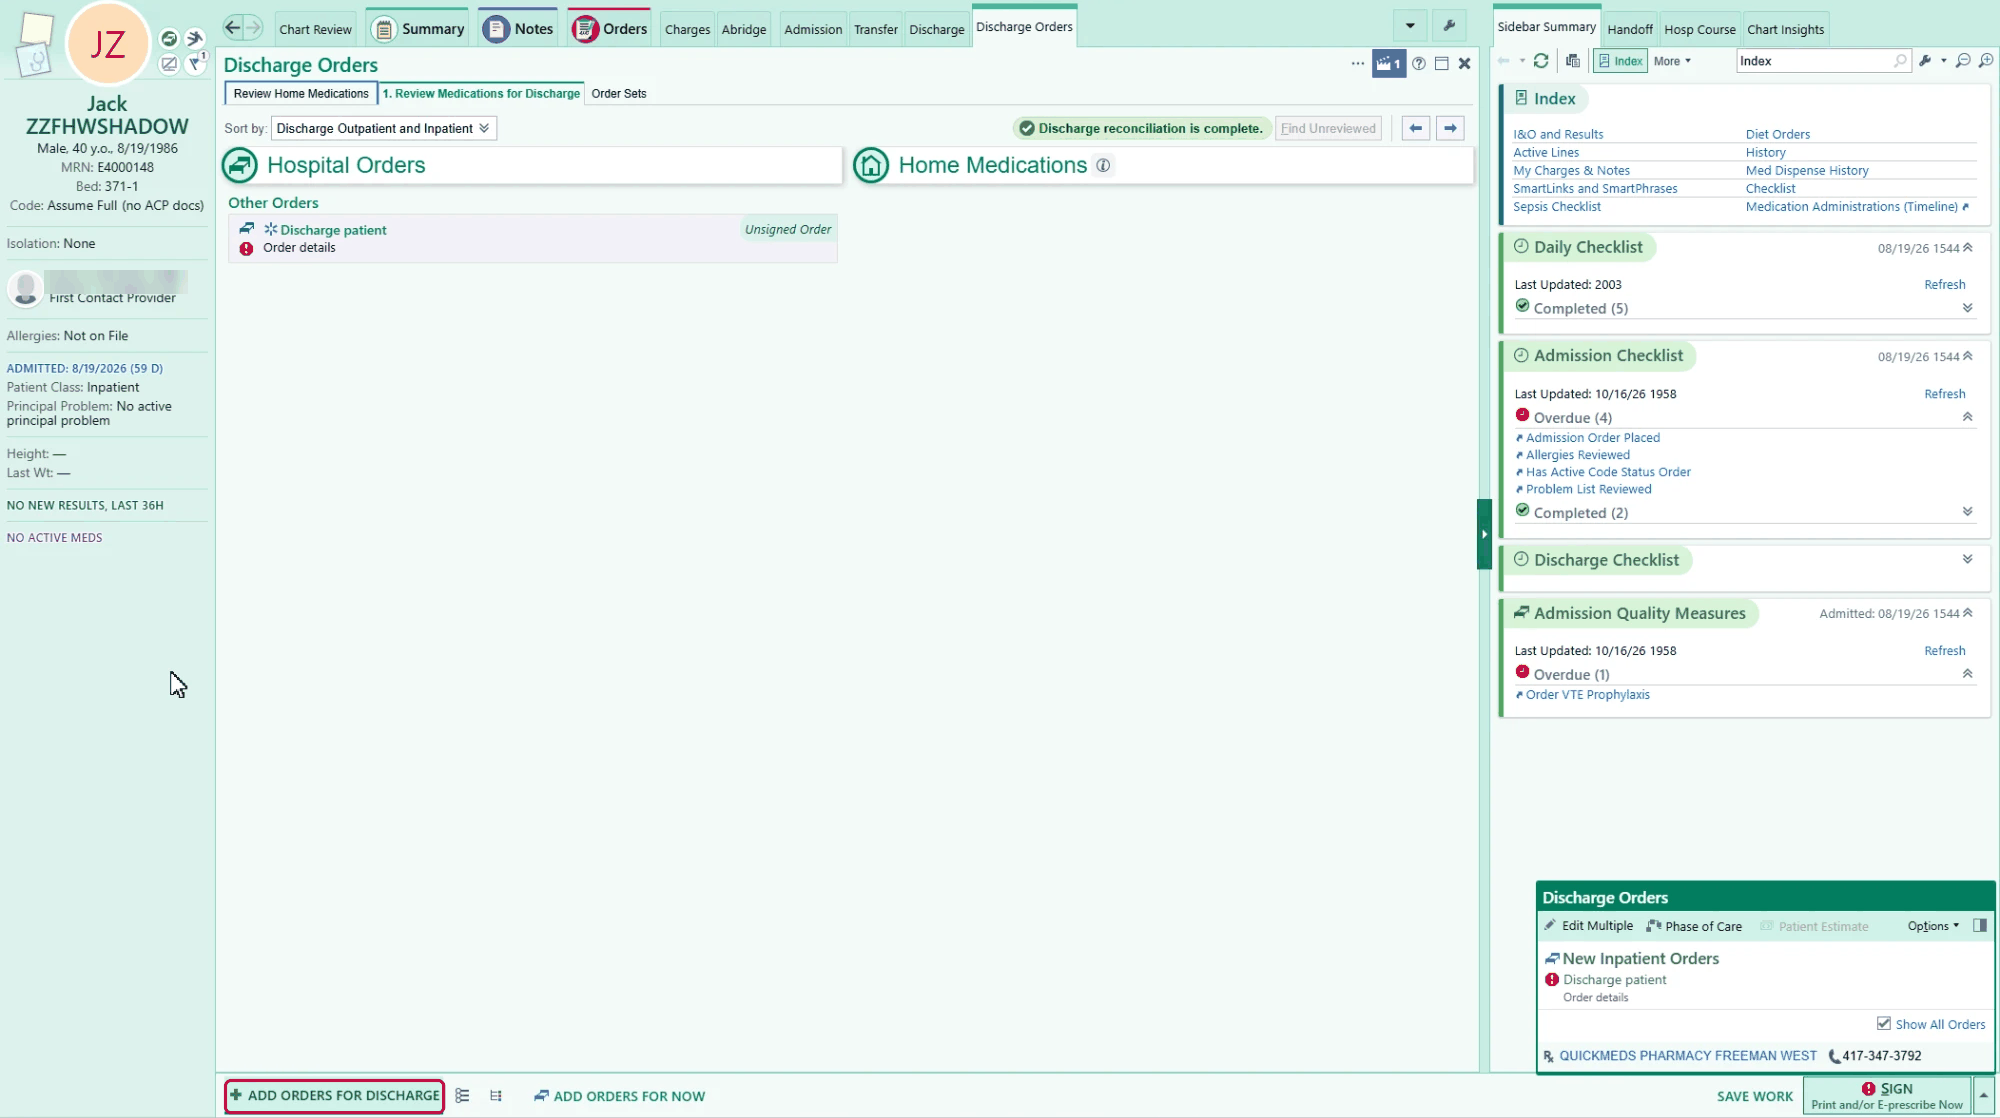
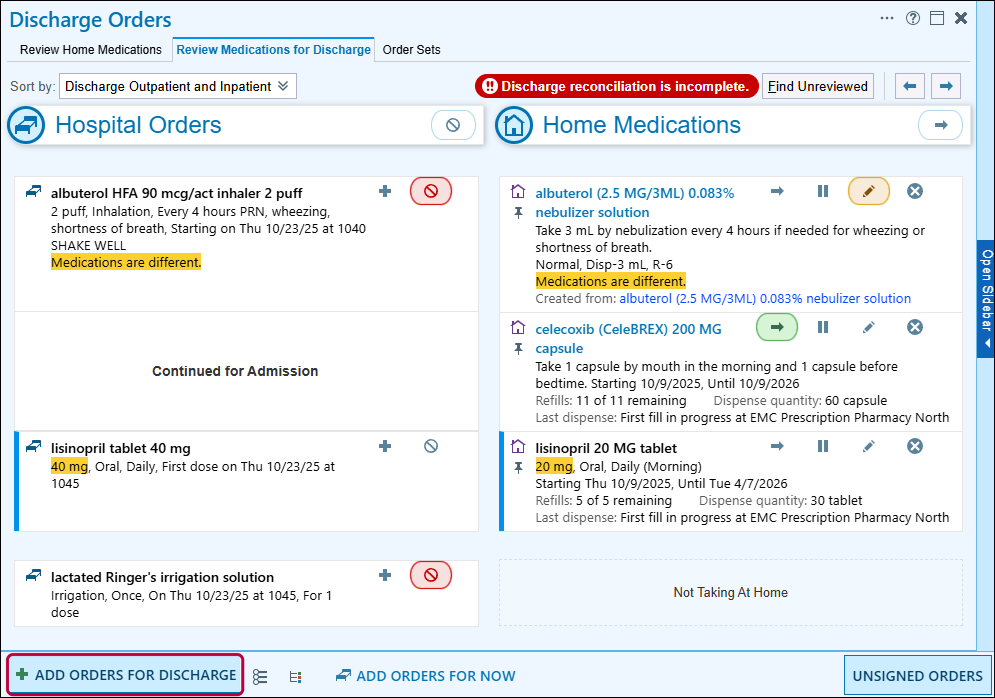
Discharge medication reconciliation. For each hospital order, prescribe it for home or stop it; for each home medication, continue, stop, or pause it. Write new prescriptions from Add Orders for Discharge (not Orders for Now); controlled substances use EPCS.
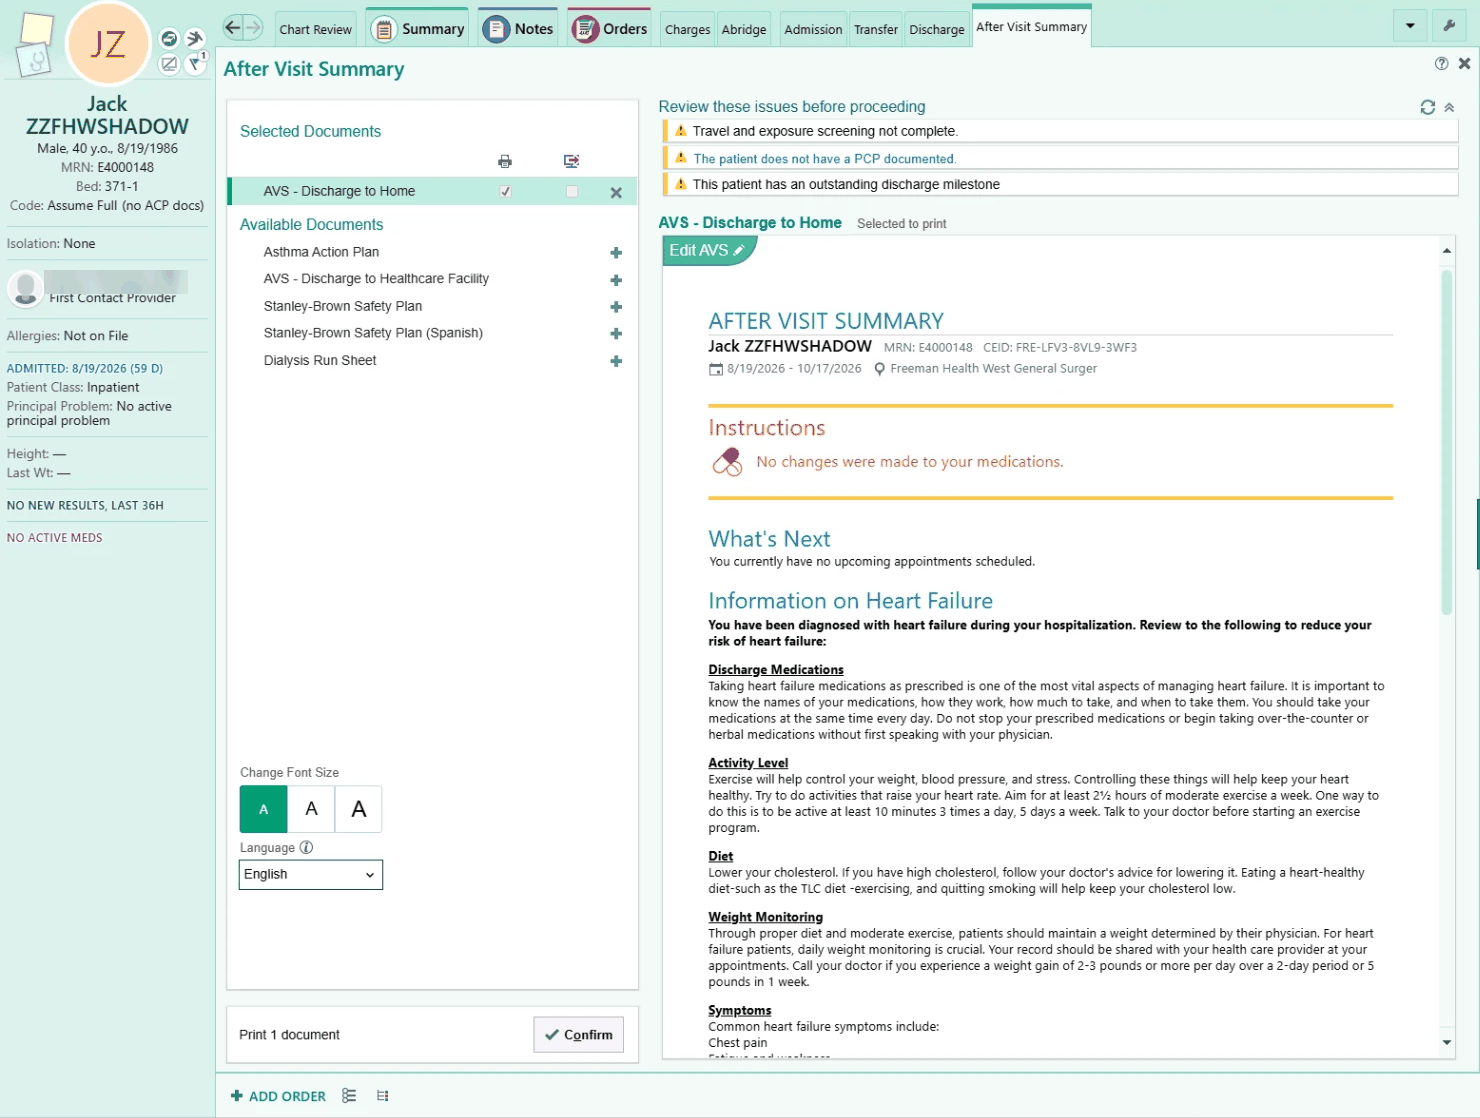
Discharge orders from an order set: disposition, date and time, diet, activity, and follow-up. In an instruction order, Generate Instructions drafts patient-friendly wording for you to edit. Preview the After Visit Summary (AVS) in the navigator.
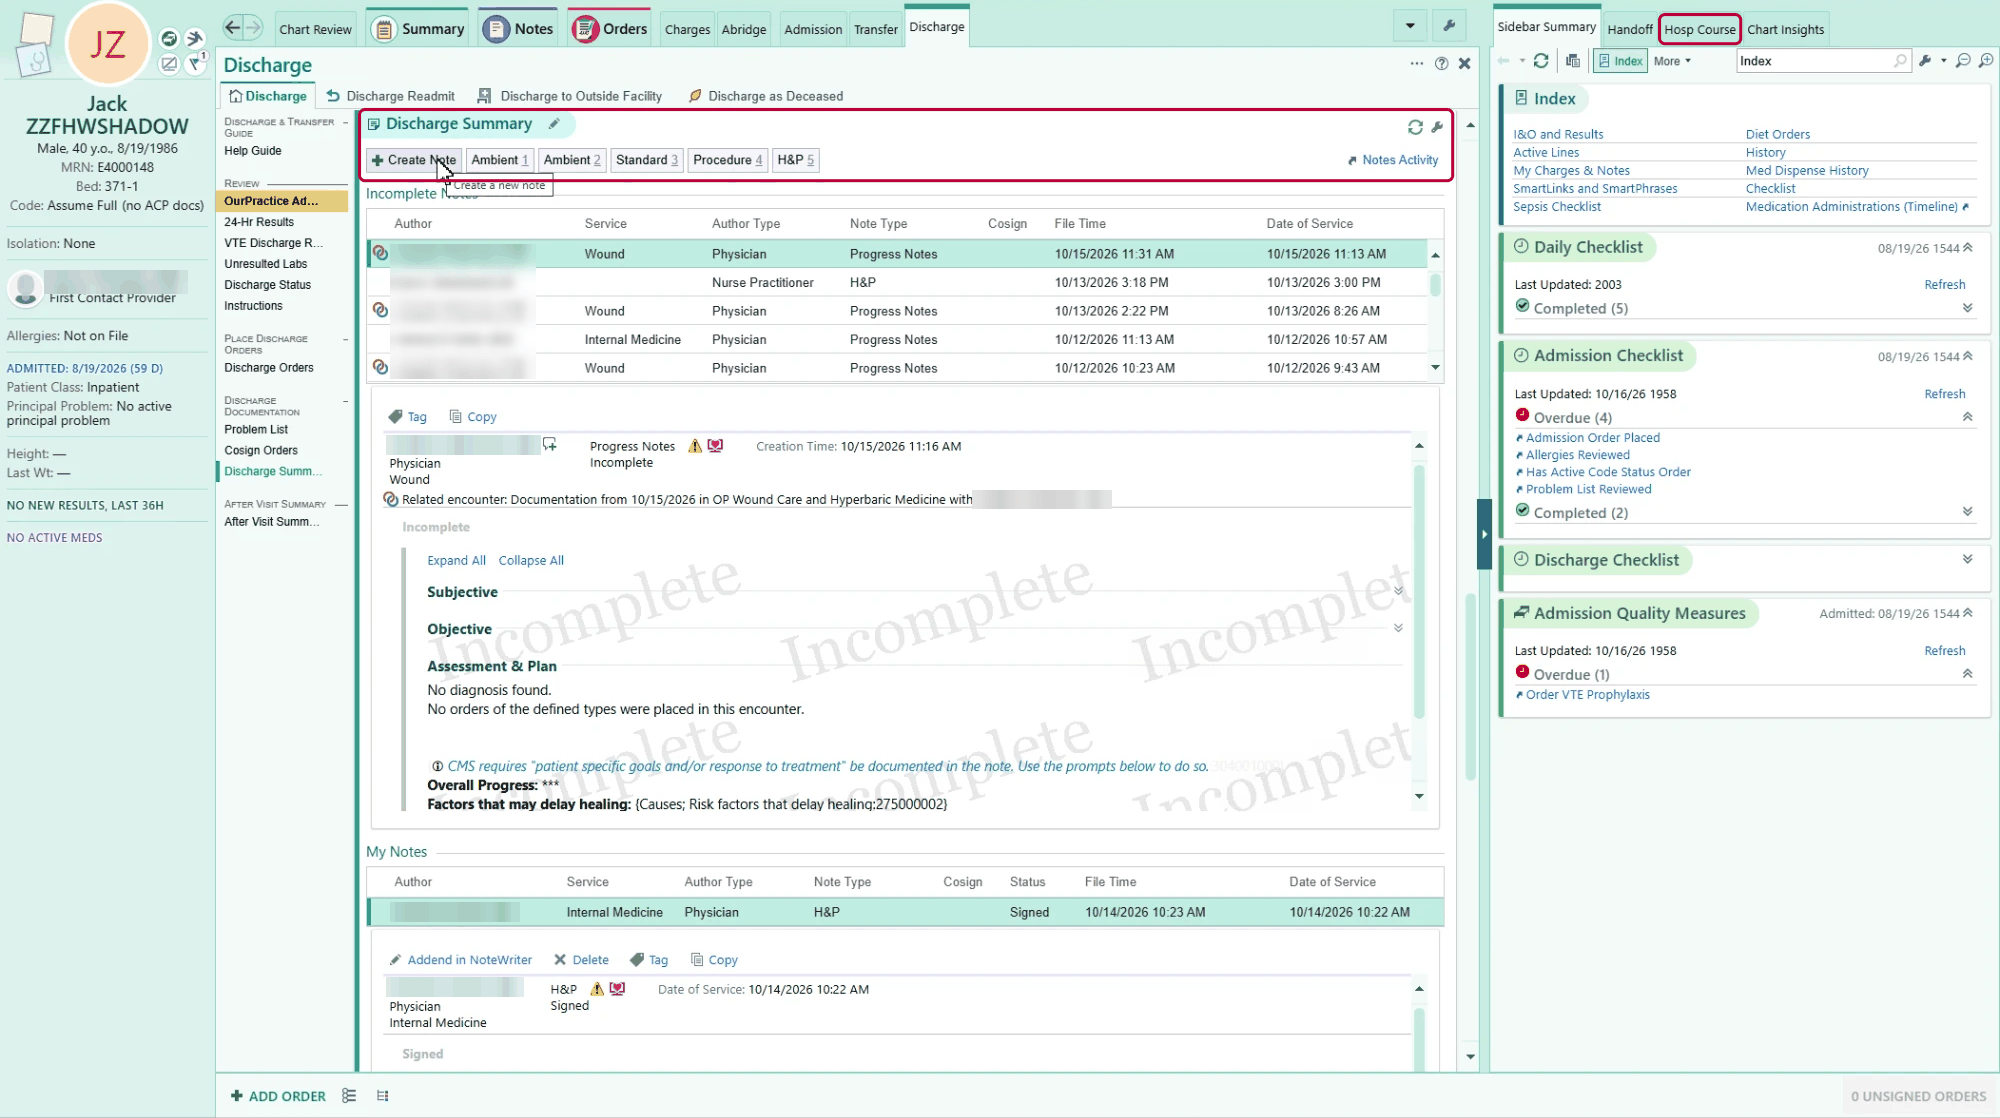
Update the problem list and write the discharge summary from the navigator. AI Hospital Course in the sidebar drafts the hospital course from the signed notes, with citations; read it, edit it, and add the last day. Results still pending at discharge go to the patient's primary care provider (PCP).
Handoff and Chart Completion
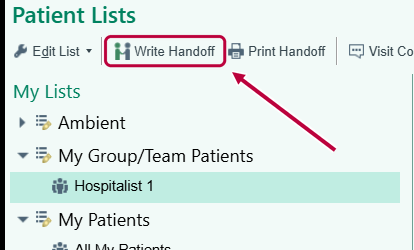
Write the handoff. Select the patient on Patient Lists and click Write Handoff (or use the Handoff tab in the chart). Add To Do items for the next provider.
Clear Chart Completion in In Basket: pended notes, orders to cosign, and notes to sign or cosign.
Charges filed? The professional charges column on Patient Lists shows which patients still need one.
Your team assignment ends with your Amion shift. Shift changes go through Amion.
Who is helping
Ask in person first, in this order. A ticket is for what nobody nearby can fix.
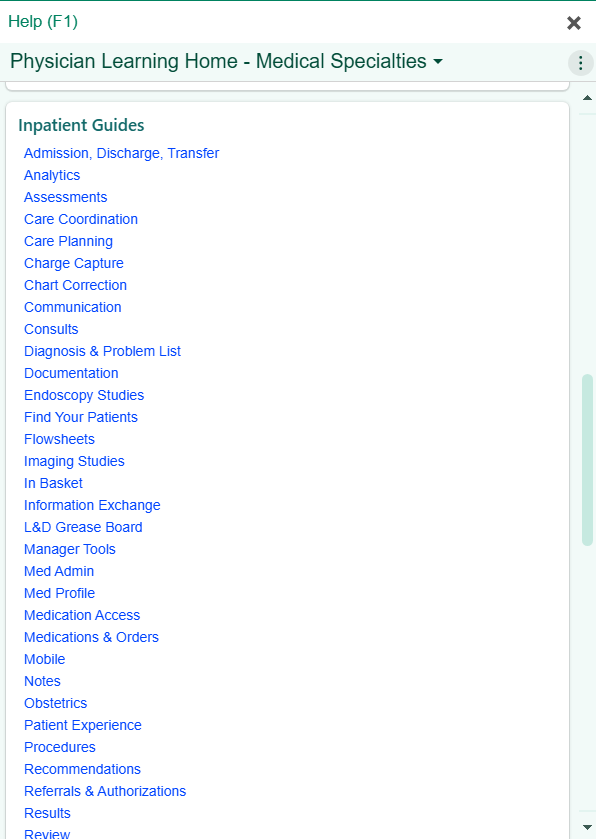
Press F1 anywhere in Epic for the Physician Learning Home: one-page Freeman tip sheets with screenshots, one workflow each.
Find a Super User in your building. Black vests, on every unit and in every clinic, for at-the-elbow help. Epic floor support staff round alongside them for the first two weeks. Each unit has its own.
Still stuck? Your Epic Physician Champion or service line director.
Something actually broken? Call the Command Center, 24/7, at 417-347-4500, or file a ticket at fhsitsm.saasit.com. Ideas that would make Epic work better go to Epic Suggestions.

Your first month
Once the basics feel routine, these are the next things that save the most time. Ask a Super User to show you any of them.
- Chart search (Ctrl+Space) for anything you would otherwise scroll for.
- Favorite the consult and unit lists you open every day.
- Use the Help button on any In Basket message you do not recognize.
- Use Haiku for charts, orders, results, and Secure Chat away from a workstation.
- Set an Out of Contact date in In Basket before time away, and your Secure Chat status.
- Build order panels and organize your preference list (see Tips and Tricks).
- Create and share your own SmartPhrases; pull labs into notes with SmartLinks.
- Add columns to your patient lists; refresh Care Everywhere when you need outside data.
- Use Edit Multiple to change several orders at once.
- Filter, color, and bookmark Chart Review; trend data in Synopsis.
- Leave yourself a Storyboard sticky note: yellow is private, blue is shared with your specialty.
- Add photos to the chart from Haiku.
← Back to Day One and Week OneOutpatient Quick Start Guide →